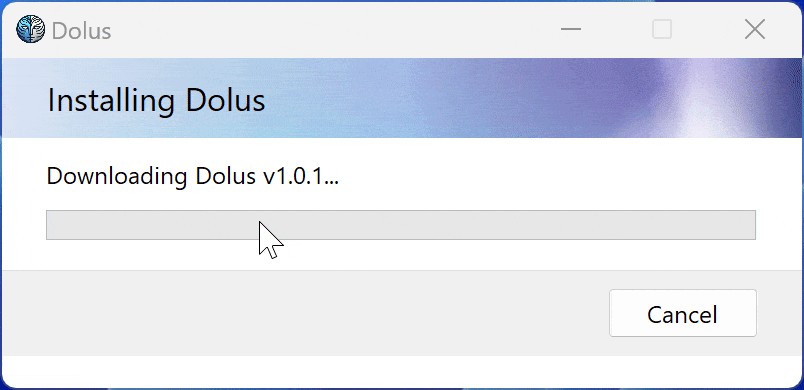
We rely on a custom bootstrapper to get Dolus up and running on your system. This little executable downloads the latest version and sets everything up. It's quick, it's easy, and it keeps you on the latest release.
But here's the catch: the bootstrapper is the first thing users see, so it needs a GUI. Since it's written in C# and AOT compiled (to keep it lightweight), traditional options like WinForms or WPF are out. Avalonia is tempting, but it would make the executable bigger than the software it's supposed to install!
So, what's left? We could dive into the Windows API to build our own Window, but that's a rabbit hole of maintenance nightmares. Fortunately, Windows has a built-in progress dialog.
Installing software is really just a mix of tasks, some with clear progress and others that are a bit more mysterious. On the surface, the built-in progress dialog seems to handle both gracefully, giving users just enough feedback to know things are moving along. But as we'll soon discover, making it play nice with our specific needs turned out to be quite the adventure.
COMing to Terms with AOT
The Windows Progress Dialog is a shell component, accessible to third-party code via COM through the IProgressDialog interface. In a typical .NET scenario, we'd import the COM interface, create an instance, and be on our merry way. But our AOT-compiled bootstrapper throws a wrench in the works.
The Traditional Approach (That We Can't Use)
Normally, we'd do something like this:
- Define the COM interface with appropriate attributes:
[ComImport, Guid("EBBC7C04-315E-11d2-B62F-006097DF5BD4")] public interface IProgressDialog { /* ... */ } - Create an instance:
var type = Type.GetTypeFromCLSID( new Guid("{F8383852-FCD3-11d1-A6B9-006097DF5BD4}")); var dialog = (IProgressDialog)Activator.CreateInstance(type); - Use the dialog and clean up:
try {
    dialog.StartProgressDialog(/* ... */);
} finally {
    Marshal.FinalReleaseComObject(dialog);
}
Simple, right? Not so fast.
The AOT Complication
AOT compilation disables built-in COM support. This means:
- No reflection-based type instantiation
- No automatic COM interop
We're left high and dry, unable to use the standard .NET COM interop features. But fear not, for where there's a will (and some clever .NET features), there's a way.
Enter ComWrappers Source Generation
.NET 6+ offers a lifeline: source generation for ComWrappers. This feature allows us to generate COM interop code at compile-time, sidestepping the AOT limitations.
Here's how we leverage it:
-
Redefine the interface with source generation attributes:
[GeneratedComInterface] [Guid("EBBC7C04-315E-11d2-B62F-006097DF5BD4")] [InterfaceType(ComInterfaceType.InterfaceIsIUnknown)] public partial interface IProgressDialog { void StartProgressDialog(nint hwndParent, nint punkEnableModless, PROGDLG dwFlags, nint pvResevered); // ... other methods ... } -
Create the COM object manually:
private nint CreateComObject() { Guid clsid = new Guid("F8383852-FCD3-11d1-A6B9-006097DF5BD4"); Guid iid = typeof(IProgressDialog).GUID; int hr = Ole32.CoCreateInstance(ref clsid, IntPtr.Zero, (uint)CLSCTX.CLSCTX_INPROC_SERVER, ref iid, out nint ptr); if (hr != 0) Marshal.ThrowExceptionForHR(hr); return ptr; } -
Use ComWrappers to get a managed object:
var comWrappers = new StrategyBasedComWrappers();
var dialogPointer = CreateComObject();
var dialog = (IProgressDialog)comWrappers
 .GetOrCreateObjectForComInstance(
     dialogPointer, CreateObjectFlags.None);
Now we can use our dialog object as if we were in a COM-enabled world:
dialog.StartProgressDialog(
    IntPtr.Zero, IntPtr.Zero, PROGDLG.Normal, IntPtr.Zero);
// ... use the dialog ...
dialog.StopProgressDialog();
Customizing the Dialog
While the IProgressDialog interface gives us a good starting point, it has its limitations. For instance, it allows us to set the title, but provides no way to set a custom icon. Fortunately, we're not limited to just what IProgressDialog offers. After all, we're dealing with a standard Windows dialog, which means we can use the Windows API to further customize it.
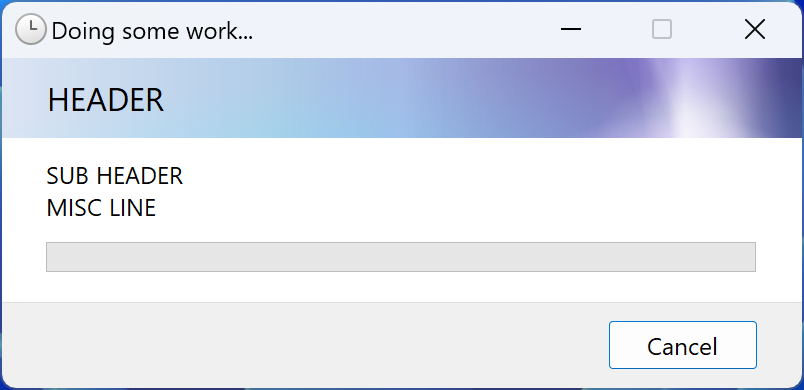
Setting a Custom Icon
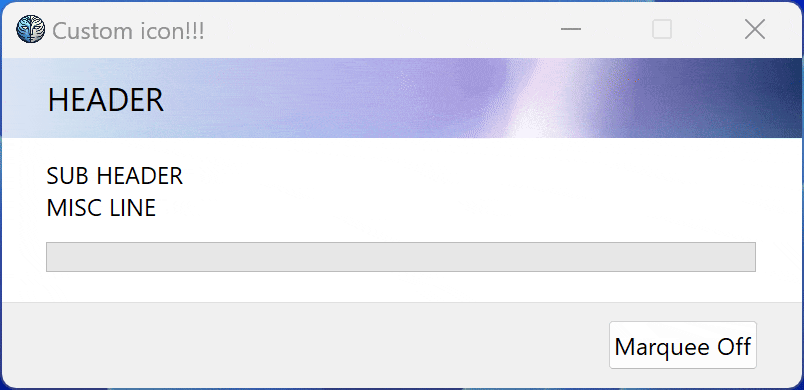
One of the first things you might want to do is set a custom icon for your installer. Here's how we tackled this challenge:
- First, we need to find the dialog window after it's created. We do this by searching for a window with our dialog's title:
HWND dialogWindow = PInvoke.FindWindow(null, _title);
- Once we have the window handle, we can set the icon. But before we do that, we need to load our icon. In our case, we're loading the icon from a byte array. Let's dive into the full icon extraction logic:
private static DestroyIconSafeHandle LoadIconFromByteArray(
    byte[] iconData)
{
    if (iconData == null || iconData.Length == 0)
    {
        throw new ArgumentException(
            "Icon data is null or empty", nameof(iconData));
    }

    try
    {
        // Check if the data starts with the correct icon header
        if (iconData.Length < 6 || iconData[0] != 0 ||
            iconData[1] != 0 || iconData[2] != 1 ||
            iconData[3] != 0)
        {
            throw new ArgumentException(
                "Invalid icon format. Expected .ico file data.");
        }

        ushort iconCount = BitConverter.ToUInt16(iconData, 4);
        Debug.WriteLine($"Icon count: {iconCount}");

        int largestIconIndex = -1;
        int largestIconSize = 0;
        int largestIconOffset = 0;

        // Parse icon directory to find the largest icon
        for (int i = 0; i < iconCount; i++)
        {
            int entryOffset = 6 + (i * 16);
            // 6 bytes for header, 16 per entry
            if (entryOffset + 16 > iconData.Length) break;

            int width = iconData[entryOffset] == 0 ?
                256 : iconData[entryOffset];
            int height = iconData[entryOffset + 1] == 0 ?
                256 : iconData[entryOffset + 1];
            int size = BitConverter.ToInt32(iconData,
                entryOffset + 8);
            int offset = BitConverter.ToInt32(iconData,
                entryOffset + 12);

            if (width * height > largestIconSize)
            {
                largestIconSize = width * height;
                largestIconIndex = i;
                largestIconOffset = offset;
            }
        }

        if (largestIconIndex == -1)
        {
            throw new ArgumentException(
                "No valid icon found in the data");
        }

        // Extract the largest icon's data
        int dataSize = iconData.Length - largestIconOffset;
        byte[] resourceData = new byte[dataSize];
        Array.Copy(iconData, largestIconOffset, resourceData, 0, dataSize);

        DestroyIconSafeHandle hIcon = PInvoke.CreateIconFromResourceEx(
            new Span<byte>(resourceData),
            true,
            0x00030000, // MAKELONG(3, 0)
            default,
            default,
            IMAGE_FLAGS.LR_DEFAULTCOLOR);

        if (hIcon.IsInvalid)
        {
            int error = Marshal.GetLastWin32Error();
            throw new Exception($"Failed to create icon. Error code: " +
                $"{error}, Icon data size: {resourceData.Length}");
        }

        return hIcon;
    }
    catch (Exception ex)
    {
        Debug.WriteLine($"Error creating icon: {ex}");
        throw new Exception(
            "Error creating icon from byte array. " +
            $"Details: {ex.Message}", ex);
    }
}
This method does several important things:
- It validates the icon data to ensure it's in the correct format.
- It parses the icon directory to find all the icons in the file.
- It selects the largest icon in the file, which is typically the highest quality.
- It extracts the raw icon data for the selected icon.
- Finally, it uses the Windows API to create an icon handle from the raw data.
- With our icon loaded, we can set it on the dialog window:
if (_icon is not null && !_icon.IsInvalid)
{
    PInvoke.SendMessage(dialogWindow, PInvoke.WM_SETICON,
        new WPARAM(0), new LPARAM(_icon.DangerousGetHandle()));
    PInvoke.SendMessage(dialogWindow, PInvoke.WM_SETICON,
        new WPARAM(1), new LPARAM(_icon.DangerousGetHandle()));
}
This sends the WM_SETICON message to our dialog window, setting both the small (0) and large (1) icons.
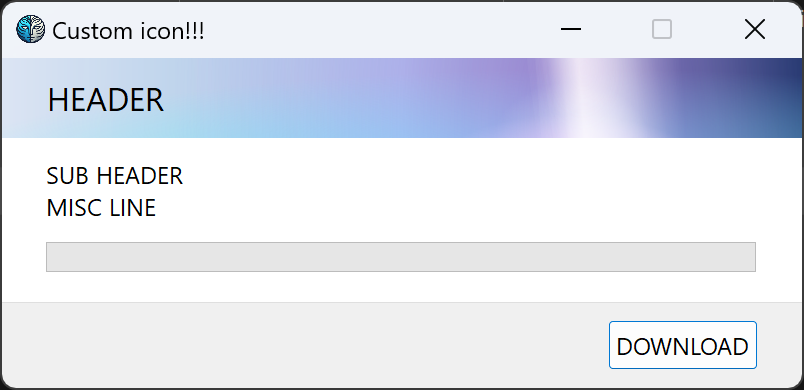
Changing the Cancel Button Text
You might think that changing the text of a simple button would be straightforward. But, surprise! The IProgressDialog interface doesn't provide a way to do this either. Fortunately, we're working with Windows, where there's always a way - usually involving more windows.
You see, in the wonderful world of Windows, everything is a window.
Button? That's a window. Text labels? A window. Progress bar? Believe it or not, also a window.

This universal "windowness" is actually a blessing in disguise. It means we can manipulate pretty much any element if we can just get a handle on it (pun intended). So, let's dive into how we find and change that pesky "Cancel" button text.
First, we need to find our cancel button. This involves a bit of window archaeology:
private unsafe void FindCancelButton(HWND directUIHWNDHandle)
{
    HWND ctrlNotifySinkHandle =
        PInvoke.FindWindowEx(directUIHWNDHandle, HWND.Null,
        "CtrlNotifySink", null);

    while (!ctrlNotifySinkHandle.IsNull)
    {
        Console.WriteLine($"Searching for cancel button in " +
            $"CtrlNotifySink handle: {ctrlNotifySinkHandle.Value}");

        HWND buttonHandle =
            PInvoke.FindWindowEx(ctrlNotifySinkHandle, HWND.Null,
            "Button", null);

        while (!buttonHandle.IsNull)
        {
            Console.WriteLine($"Found a Button handle: " +
                $"{buttonHandle.Value}");
            _cancelButtonHandle = buttonHandle;

            // Check if the button is visible
            if (PInvoke.IsWindowVisible(buttonHandle))
            {
                Console.WriteLine("Found actual handle");
                return;
            }
            buttonHandle =
                PInvoke.FindWindowEx(ctrlNotifySinkHandle,
                buttonHandle, "Button", null);
        }

        ctrlNotifySinkHandle =
            PInvoke.FindWindowEx(directUIHWNDHandle,
            ctrlNotifySinkHandle, "CtrlNotifySink", null);
    }
}
This method does a few key things:
- It starts from a parent window and looks for child windows of class "CtrlNotifySink".
- Within each "CtrlNotifySink", it searches for "Button" windows.
- For each button, it checks if that button is visible.
- If it finds a button which is visible (there is only one visible button on the dialog), it stores the handle and we're done!
Now that we have our cancel button handle, we can change its text:
public void SetCancelButtonText(string newText)
{
    if (_cancelButtonHandle.IsNull)
    {
        return;
    }
    if (PInvoke.SetWindowText(_cancelButtonHandle, newText))
    {
        // Force the Cancel button to redraw
        RECT? rect = null;
        PInvoke.InvalidateRect(_cancelButtonHandle, rect, true);
        PInvoke.UpdateWindow(_cancelButtonHandle);
    }
    else
    {
        int error = Marshal.GetLastWin32Error();
        Console.WriteLine($"Failed to set Cancel button text. " +
            $"Error code: {error}");
    }
}
Here's what's happening:
- We check if we have a valid handle to the cancel button.
- We use
SetWindowTextto change the button's text. Yes, even button text is just window text in Windows! - We force the button to redraw itself, because sometimes Windows needs a little nudge.
Extending the Dialog's Functionality: Marquee Mode and Progress Updates
After tackling icons and button text, we faced another limitation: the inability to switch between marquee and standard progress modes once the dialog is started. It's a peculiar design choice, especially considering that Microsoft.Windows.Common-Controls supports this functionality. But fear not! Our "everything is a window" philosophy comes to the rescue once again.
Toggling Marquee Mode
The key to toggling marquee mode lies in manipulating the progress bar's window style. Here's the crucial part of our implementation:
if (_state != ProgressDialogState.Stopped &&
    !_progressBarHandle.IsNull)
{
    int style = (int)GetWindowLongPtr(_progressBarHandle,
        (int)GWL.GWL_STYLE);

    if (value) // Turning marquee on
    {
        style |= (int)PBS.PBS_MARQUEE;
        SetWindowLongPtr(_progressBarHandle, (int)GWL.GWL_STYLE,
            (IntPtr)style);
        PInvoke.SendMessage(_progressBarHandle, PBM_SETMARQUEE,
            PInvoke.MAKEWPARAM(1, 0), 0);
    }
    else // Turning marquee off
    {
        style &= ~(int)PBS.PBS_MARQUEE;
        SetWindowLongPtr(_progressBarHandle, (int)GWL.GWL_STYLE,
            (IntPtr)style);
        PInvoke.SendMessage(_progressBarHandle, PBM_SETMARQUEE,
            PInvoke.MAKEWPARAM(0, 0), 0);

        // Reset the range and position
        PInvoke.SendMessage(_progressBarHandle, PBM_SETRANGE32,
            0, _maximum);
        PInvoke.SendMessage(_progressBarHandle, PBM_SETPOS,
            PInvoke.MAKEWPARAM((ushort)_value, 0), 0);
    }
}
This code snippet demonstrates how we toggle the PBS_MARQUEE style flag and send the appropriate messages to start or stop the marquee animation.
The Progress Update Conundrum
Here's where things get interesting. While our marquee mode toggle works beautifully, we discovered that calling nativeProgressDialog.SetProgress does nothing after we force a switch. It seems IProgressDialog is keeping some internal state and thinks it's still in marquee mode, so it doesn't update the progress.
But remember, we have a direct line to the progress bar window. We can bypass IProgressDialog entirely and update the progress ourselves:
private void UpdateProgress()
{
    if (_nativeProgressDialog != null &&
        _state != ProgressDialogState.Stopped)
    {
        _nativeProgressDialog.SetProgress(
            (uint)_value, (uint)_maximum);

        if (!_progressBarHandle.IsNull && !Marquee)
        {
            // Directly update the progress bar
            PInvoke.SendMessage(_progressBarHandle, PBM_SETPOS,
                PInvoke.MAKEWPARAM((ushort)_value, 0), 0);
        }
    }
}
By directly sending a PBM_SETPOS message to the progress bar window, we ensure that the progress is updated regardless of what IProgressDialog thinks the current mode is.
When you put all these things together, you get a fully customized progress dialog:
Wrapping Up
We've taken a deep dive into extending the Windows Shell Progress Dialog, turning a simple component into a flexible, customizable tool for our installer. Through this journey, we've seen how understanding the Windows API can open up possibilities far beyond what high-level interfaces provide.
If you're curious about the nitty-gritty details or want to explore the code yourself, you can find the full source for our bootstrapper on GitHub.
And if you'd like to see all of this in action, why not give Dolus a try? You can install it here.
Happy coding, and may your windows always respond to your messages!